One of the challenges that saccos face is access to timely and correct information. The FinITC Sacco Management Solution does not have this limitation because all information is found in one common database.
1.1. Real Time
Another typical problem is that information entered in excel files is frequently not available in real-time. This means that records may be updated only at certain intervals during a period (hour, day, week, or month). The advantage of the FinITC Sacco Management Solution is that as soon as data is entered into the system, it becomes instantly available. The disadvantage is that incorrectly entered data will be seen also. Users must be cautious when they enter data into the system. It is very important that only correct data reside in the system.
1.2. Beyond Sacco Processes
With the FinITC Sacco Management system, saccos can process activity beyond the known sacco processes. For example, the sacco management systems can support investments and financial accounting.
1.3. Roles and Authorization
Although information in the Sacco management system is readily available, proper authorization is required. Access to data is frequently determined by one's job role and responsibilities within the sacco. For example, a sacco member is authorized to create, view, and modify his/her sacco loan, but cannot create new sacco members.
1.4. The Sacco System
The FinITC Sacco Management System is a fully integrated relational database system that lets you enter and maintain financial and other sacco business activities in one place. The FinITC Sacco System has modules such as General Ledger, Receivables, Cash Management, Loan Management and Investments.
Installation
Yes, the product is cloud by design. No installation files are required. Using a Sacco Management System in the cloud means always being up-to-date with the latest version of the product.
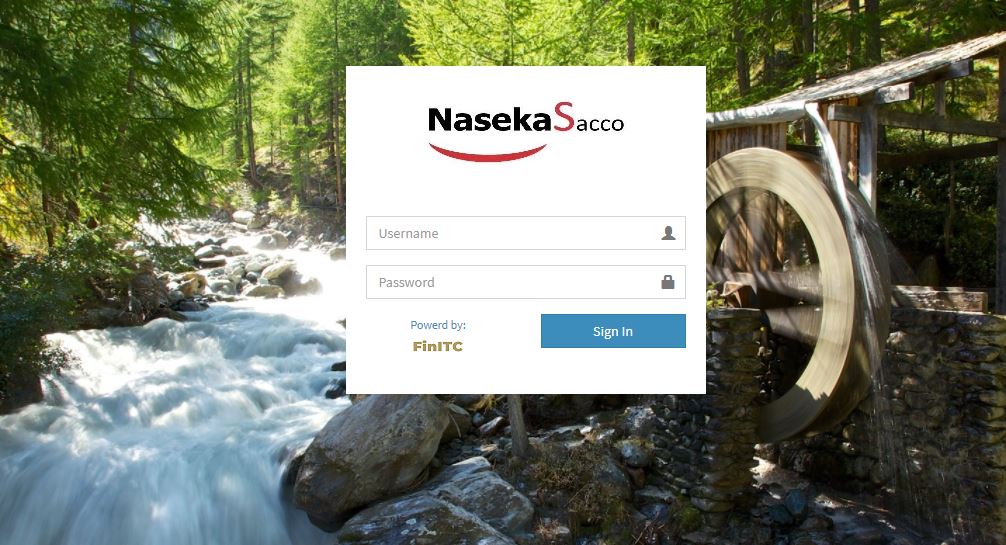
2.1. Sign Up
To create an account, please contact your sacco administrator to provide you with a username and password that will prompt for change on first login. Use this link to access the system https://nasekasacco.com
2.2. Create an Account
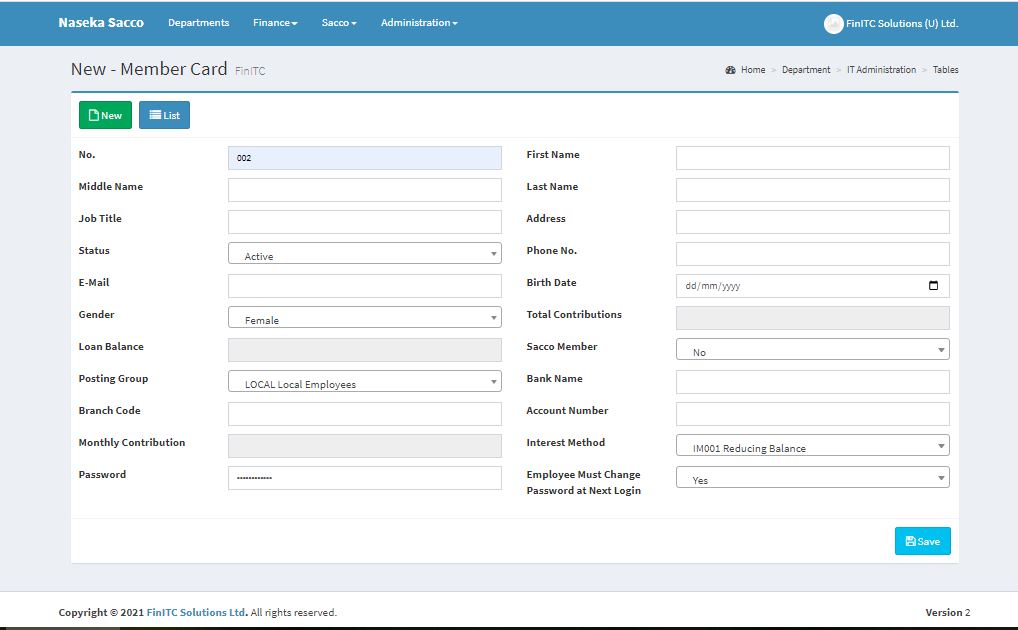
Member Accounts are created by the Sacco Administrators by clicking Departments > Sacco Details > Members > New. Enter the No., Posting Group, Interest Method, set the Default Password. Share the No and password with the member to login so that they can update their Profile. The No. is used as the username for member login.
2.3. Member Login
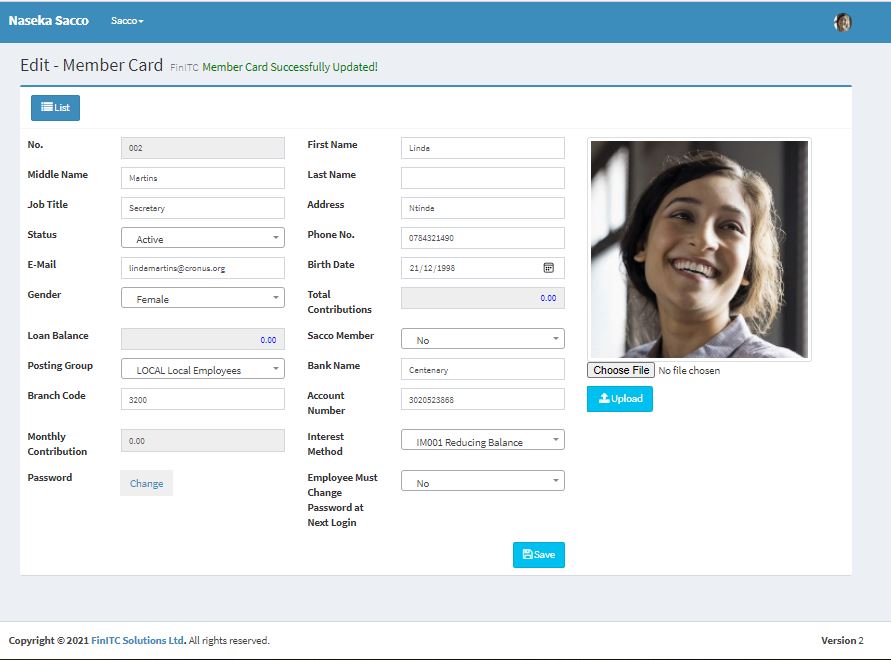
Use the Member No./Payroll ID/Employee No., provided by the Sacco Administrator and the default password to log on to the system. The system will prompt you to change the password at first login. Once the password has been changed, Click Sacco under the top navigation bar > Sacco Details. Select My Profile from the Setup group. Click the Pencil/Edit icon to update your member profile and finally click save. You can also choose a picture from your local computer and upload it to your profile as shown below.
System Overview
This section introduces the general concepts of the user interface design of the Sacco Management System. With the user interface, you can focus, prioritize, and apply your expertise.Key data is visualized so that you better understand your business. The user interface has different components, which are discussed.
3.1. Home Page - Administrators
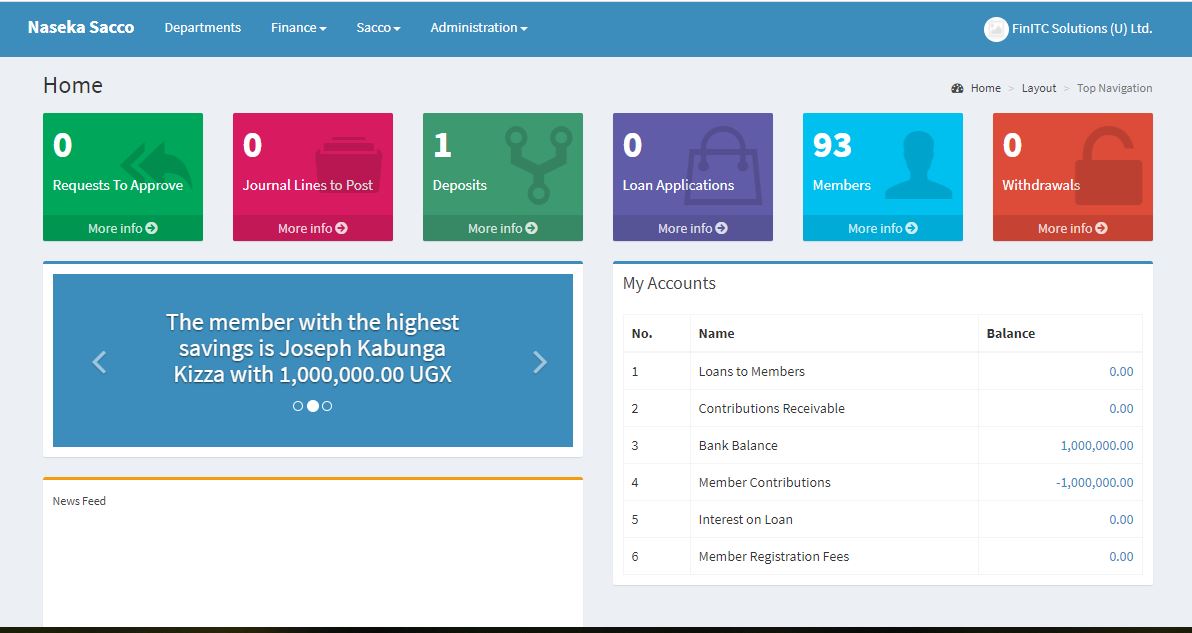
Once the Administrator has been authenticated and authorized, they will be redirected to the home page.
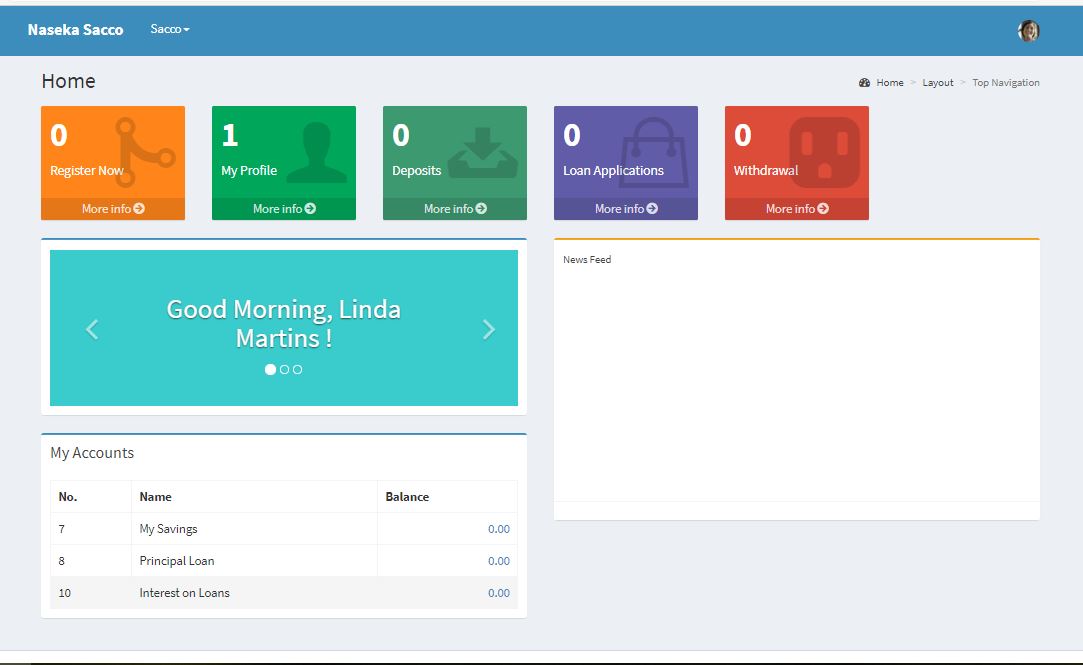
3.2. Home Page - Member
Once the Sacco Member has been authenticated and authorized, they will be redirected to the member home page.
3.3. Navigation bar
The navigation pane appears on the top of the user interface. You use the navigation pane to switch between different menus. From the navigation bar, you can open list places. An example of a list place is the member list. From a list place, you can open individual cards or documents. The navigation pane displays one menu at a time. Depending on your user profile, various activity buttons may be available
3.4. Menu Items
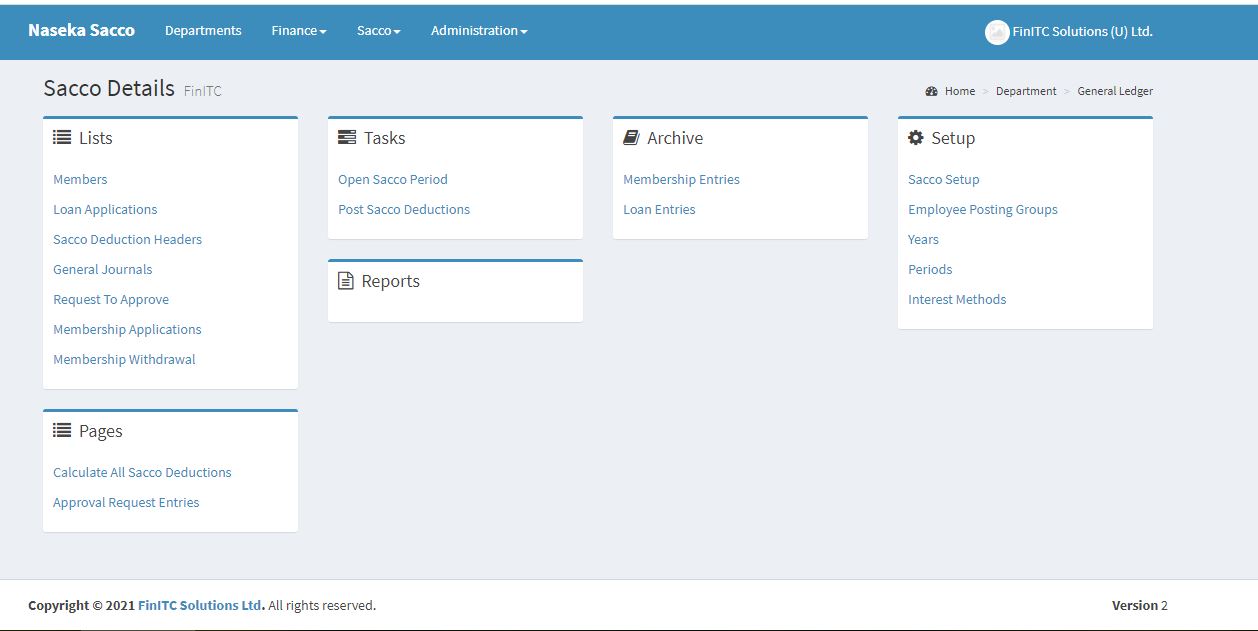
Items on the navigation bar are grouped into Lists(working data), pages (filtered working data), tasks (actions to perform), reports (analysis of data), archive (historical information) and setup (application area configuration settings). Below are the Sacco Details menu items.
3.5. Pages - Lists
Pages are the main way to display and organize data. Pages offer a visual experience. Every user has a home page, customized to the individual needs and tasks that each user performs. Other types of pages, such as list pages might display lists of general ledger accounts, members or bank accounts, whereas others such as worksheet pages focus on user tasks.
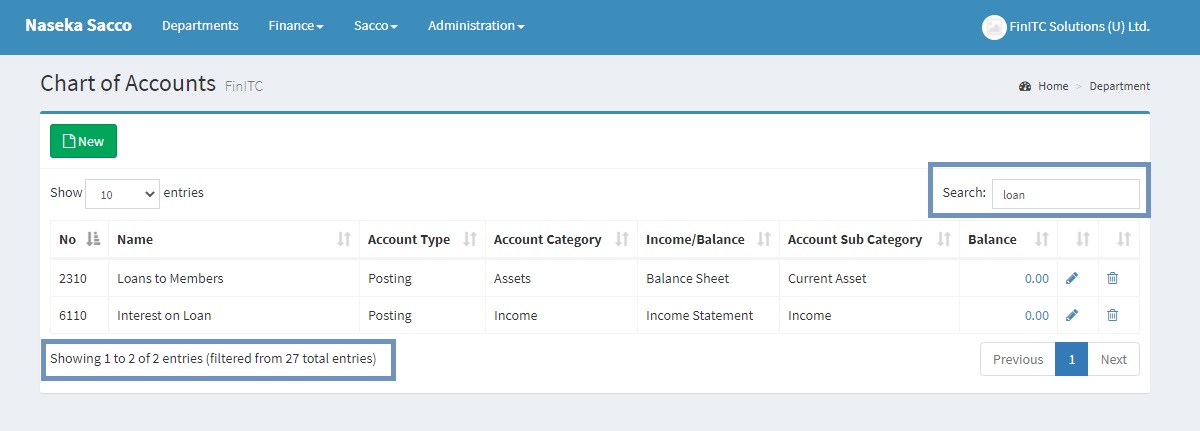
3.6. Filter & Search
You use the filter box to display accounts, members, entries, or other records by specifying criteria for fields in a table. The example below searches and filters out all G/L accounts with a word Loan
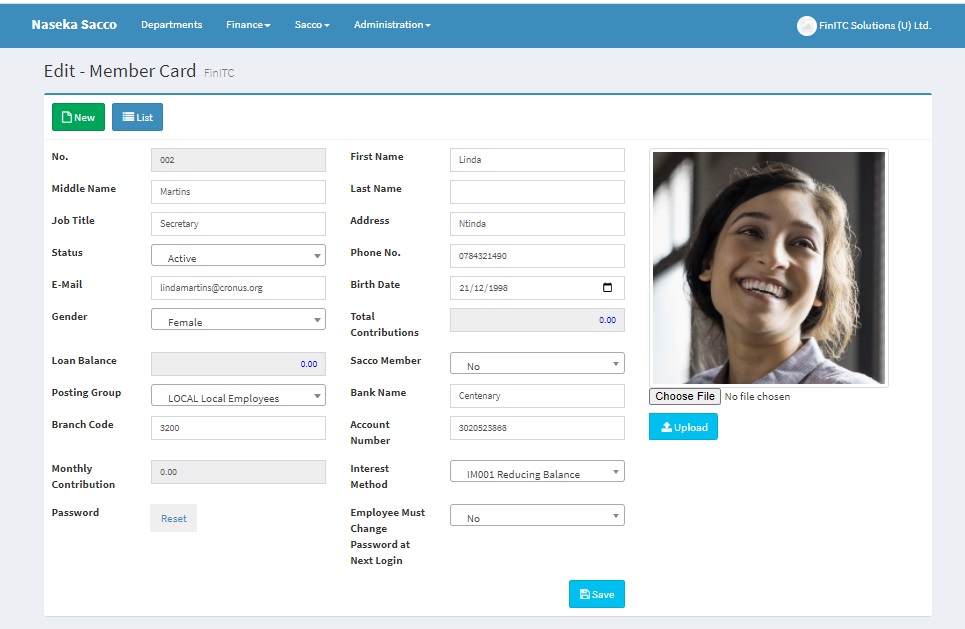
3.7. Card Page
You use a card page to view and edit one record or entity from a list of records. The card page displays selected fields from the record. An example of how to use a card page is for creating / editing a sacco member.
3.8. Enter and Edit Information
The way to add and edit information in fields depends on the type of field. When you enter information into fields, the system provides the format for the type of information that you enter in the following types of fields. Date fields - accept only date parameters, Number fields - accept only numbers, Text fields - accept information in any format, Code fields –accept only predefined codes, FlowFields – display amounts and quantities calculated by the system, for example the Balance field for G/L accounts. The system provides flexibility when you enter dates. It displays a calendar from which the user selects the required date.
3.9. Send to Word, Excel and PDF
Any page can be exported to a Word, Excel, or PDF. For example, to send a member list to Excel, On the member list, click the Member List drop down, Select Excel from the drop down list.
3.10. Sort Information
With the sorting functionality in System, you can decide the order in which information is displayed. For example, if you have many general ledger entries, you can choose to order them by one of the available fields. To change the sorting order of a list, Click the up and down arrows next to the field to sort by that specific field.
General Setup
The General Setup window is used to specify a default setting for the general ledger and other application areas.The general setup must be completed for each sacco that is set up in the system.
4.1. General Setup Card
The General Setup contains the basic setup defaults such as the Allow Posting From and Allow Posting To which limits the Sacco Accountant from posting in closed periods.
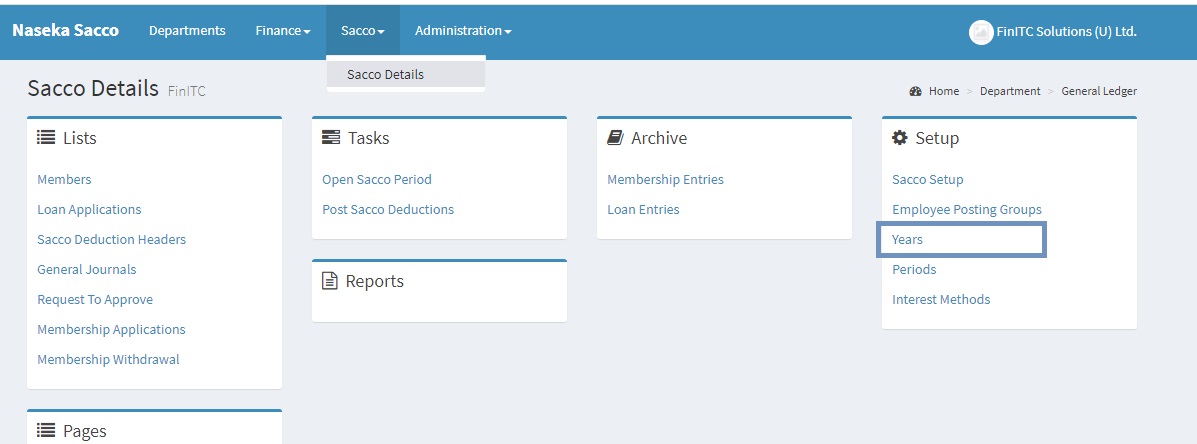
4.2. Accounting Period
With accounting periods, users can create time references in the system. A fiscal year consists of several accounting periods. The shortest possible fiscal year consists of one accounting period with one month. You can use the Years window both open Fiscal Years and Define Accounting periods. Creating a new year will automatically create accounting periods each of one month. The accounting Periods can be viewed by clicking Sacco > Sacco Details > Periods.
General Ledger
Two main components of the General Ledger application area are the Chart of Accounts and General Journals. These will be discussed in this section.
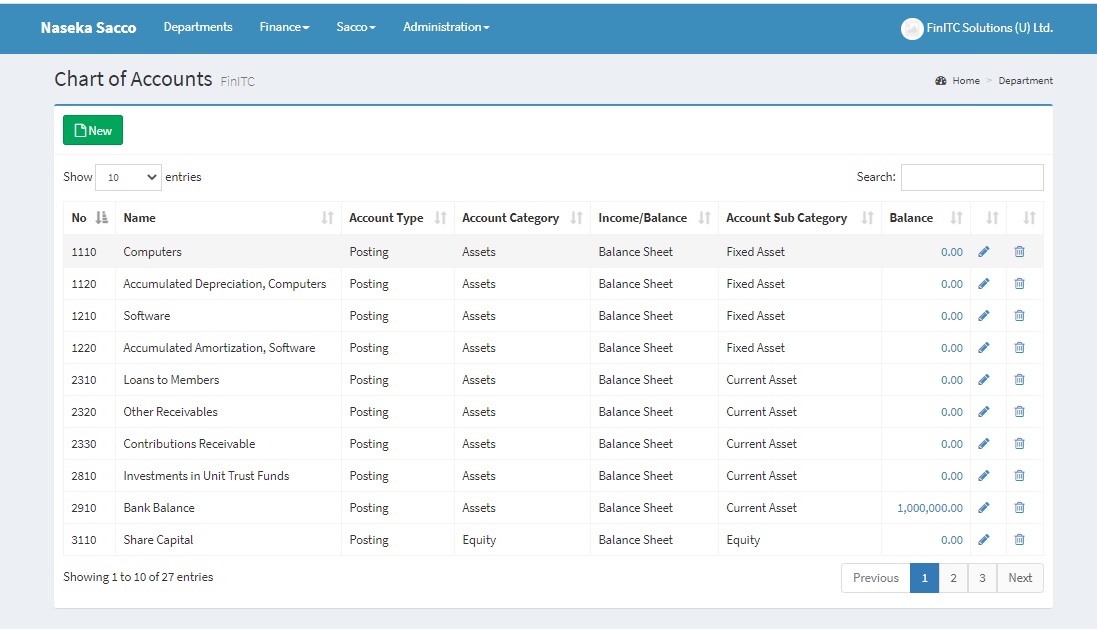
5.1. Chart of Accounts
The Chart of Accounts provides quick access to G/L Accounts and balances. This is the heart of the Sacco Management System. Every process executed in the Sacco Management System ends up in the Chart of Accounts
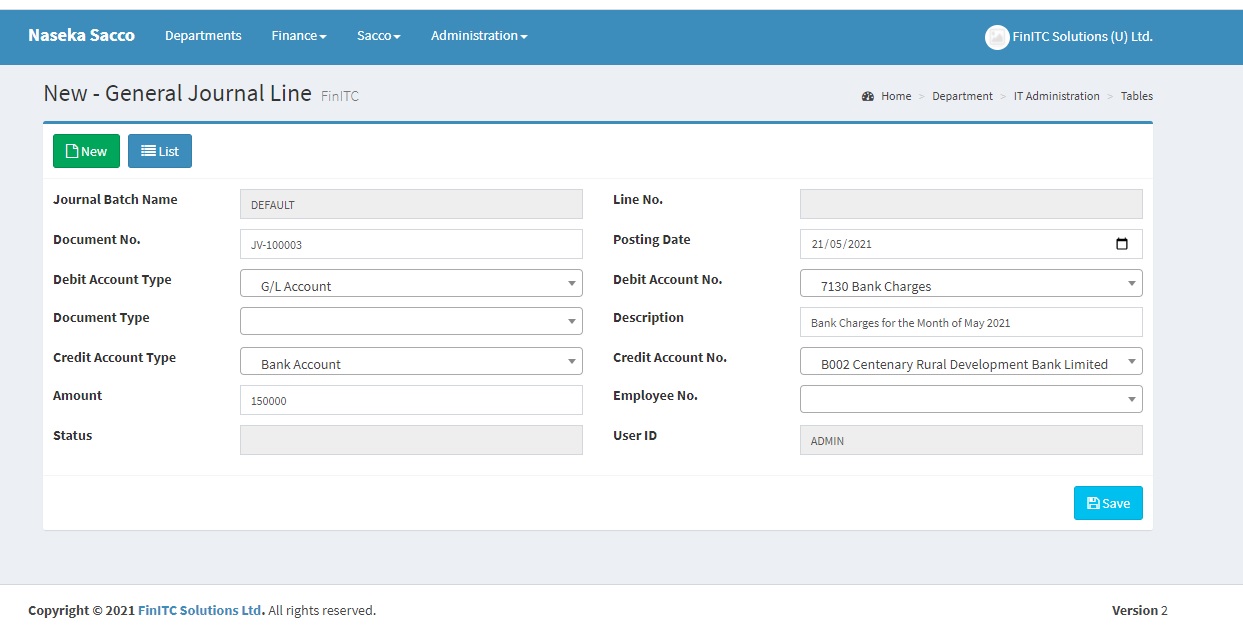
5.2. Creating and Posting Journal Entries
Users can create and post journal entries. To enter lines in a general journal, On the navigation bar, click Finance > General Ledgers > General Journals. Click the Number in the "Edit Journal" column. This will open the selected General Journal Batch. Enter the relevant fields and click Save.
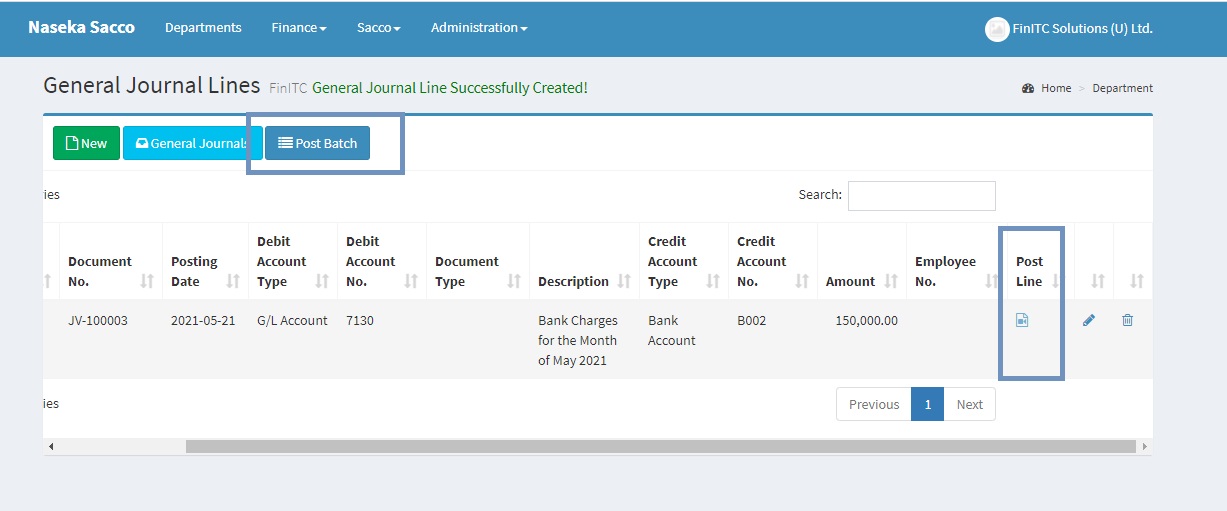
5.3. Post General Journal Lines
To post the general journal line, Scroll to the right of the Journal line and click the icon below Post Caption. Click Yes to post the journal line. In order to post multiple journal lines, click the Post Batch and Click Yes.
5.4. Reviewing Posted Entries
On the navigation pane, click Finance > General Ledger > Under the Archives Group, select General Ledger Entries. Click the Entry No. field to sort by either ascending or descending. Two entries are created to complete the double entry.
Receivables
Receivables are claims for payment held by the Sacco for services rendered to the sacco members such as loan disbursments and member registration fees that sacco members have ordered but not paid for.
6.1. Create a Sacco Member
As the accountant manager at Naseka Sacco, you are responsible for setting up new members. A new member, Linda Martins, has contacted your SACCO and requested to start saving with the Sacco. You have agreed on the SACCO policies and you must create a member card for the member in the database so that receiving of membership fees can start. Refer to Section 2.2: Create an Account.
Self Service
The Sacco Management System allows sacco members to access their information and perform routine tasks with limited interaction with the sacco administrator. Sacco Members can download their member statements, make sacco deposits, withdraws and requistions for sacco loans.
7.1. Update Profile
Use the Member No./Payroll ID/Employee No., provided by the Sacco Administrator and the default password to log on to the system. The system will prompt you to change the password at first login. Once the password has been changed, Click Sacco under the top navigation bar > Sacco Details. Select My Profile from the Setup group. Click the Pencil/Edit icon to update your member profile and finally click save. You can also choose a picture from your local computer and upload it to your profile as shown below.
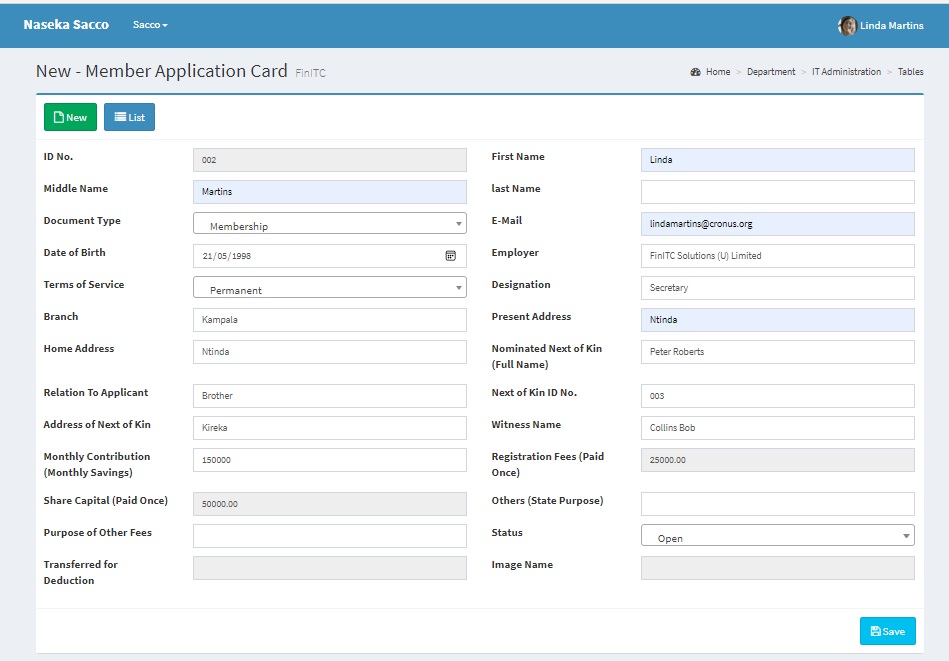
7.2. Register as a Member
After updating your profile by following the steps highlighted above, click the right top icon to sign out and sign in again for the profile changes to take effect. On the Navigation bar, Click Sacco > Sacco Details. Select Application for Membership under the Setup Group. Click New and enter the relevant fields.
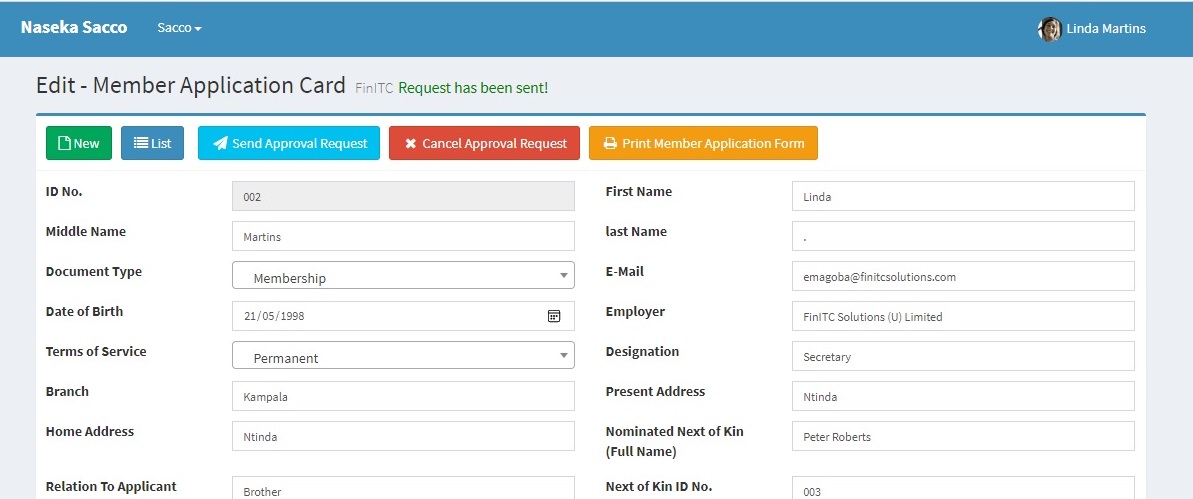
7.3. Send Member Application for Approval
Edit the Member Application Card by clicking the edit Action or Pencil icon on the member application. Click the Send Approval Request Action. This will send the request to the approver.
7.4. Cancel Approval Request
A member can recall a request that has already been sent for approval by click the Cancel Approval Request. It should be noted that only requests with a status of Pending Approval can be recalled or Cancelled. Already approved requests can not be cancelled. Their net effect can only be cancelled by passing reversing general ledger entries. This will be covered in later chapters.
7.5. Approve Requests
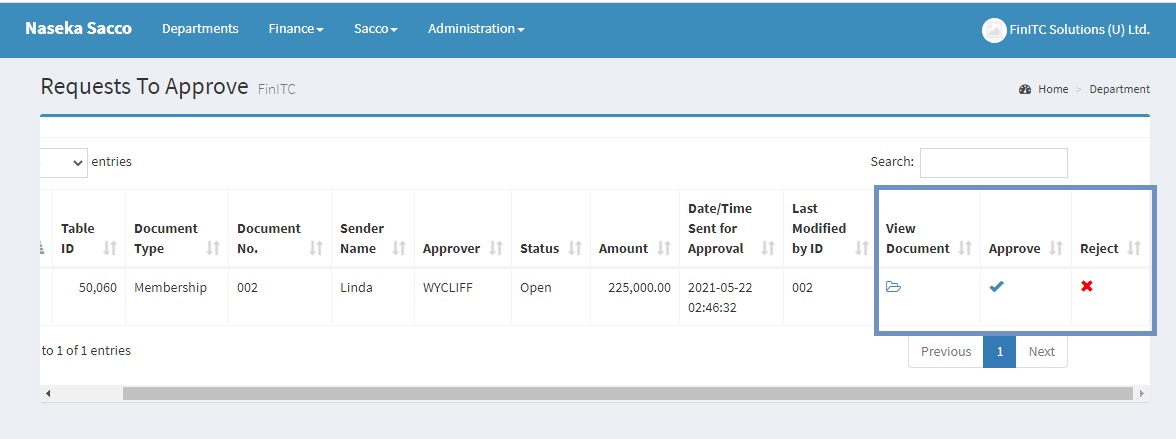
This is done by the sacco administrator by navigating to the "Requests To Approve" either through click More info on the Request To Approve tile on the home page or by Clicking Sacco on the navigation bar > Sacco Details and selecting Requests To Approve under the list group. The administrator can decided to view the details of the document, Approve or Reject the request. Rejecting the request will require a rejection comment. See image below.
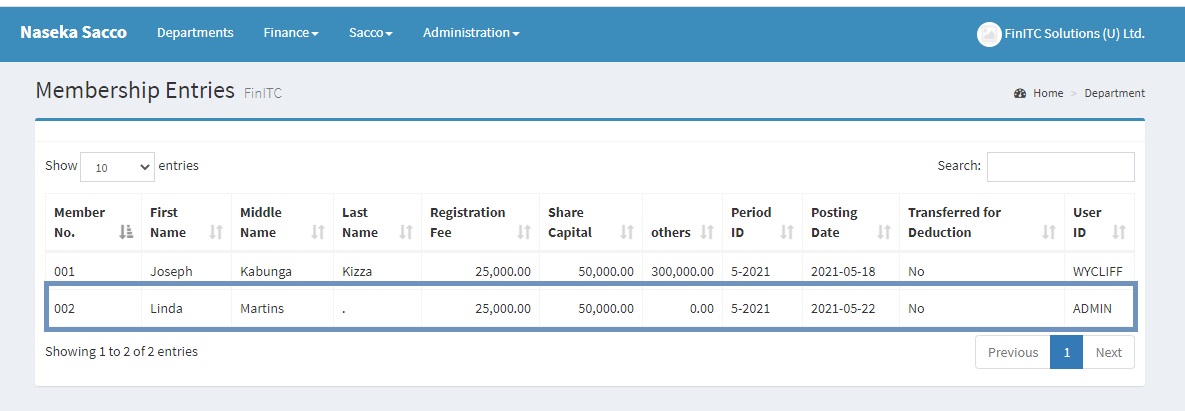
7.6. Membership Entries
Once the Application for membership has been approved, the system will crate a membership entry. This can be seen by clicking Sacco > Sacco Details, and then selecting Membership Entries under the Archive group. The membership entry with "Transferred for Deduction" set to No will be suggested by the system while computing the monthly deduction schedule for the Period ID also specified in the same membership entry.
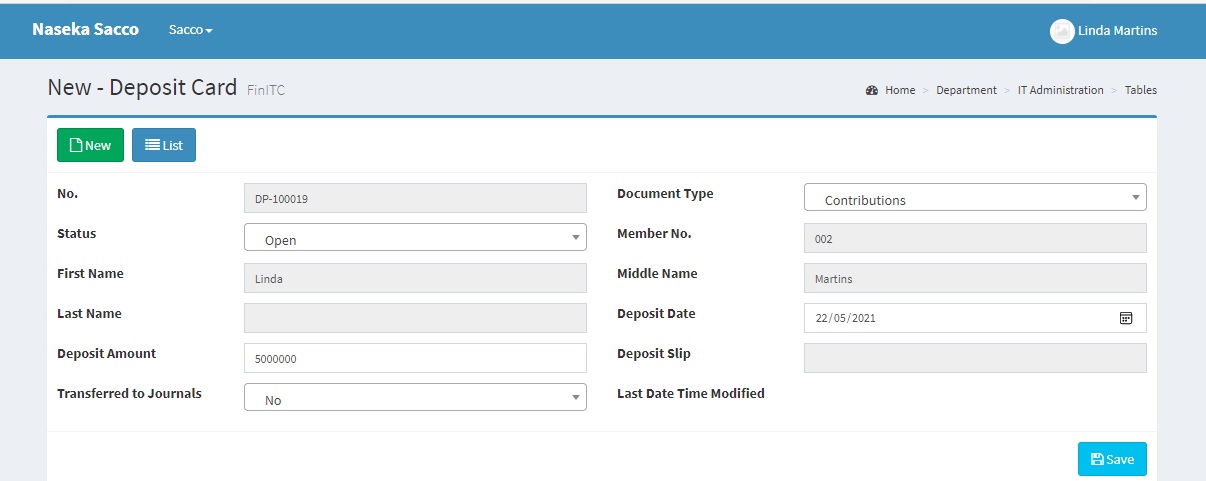
7.7. Deposits
Money can be deposited on the SACCO account either by using Mobile Money or through the Bank. Once the transaction has hit the SACCO account, the SACCO administrator can register the transaction through the journals to reflect in the SACCO ledgers. Alternatively, the SACCO member can also register the transaction by clicking "Sacco > Sacco Details" and then selecting "Deposits" under the list Group. Click New , populate the required fields and click save.
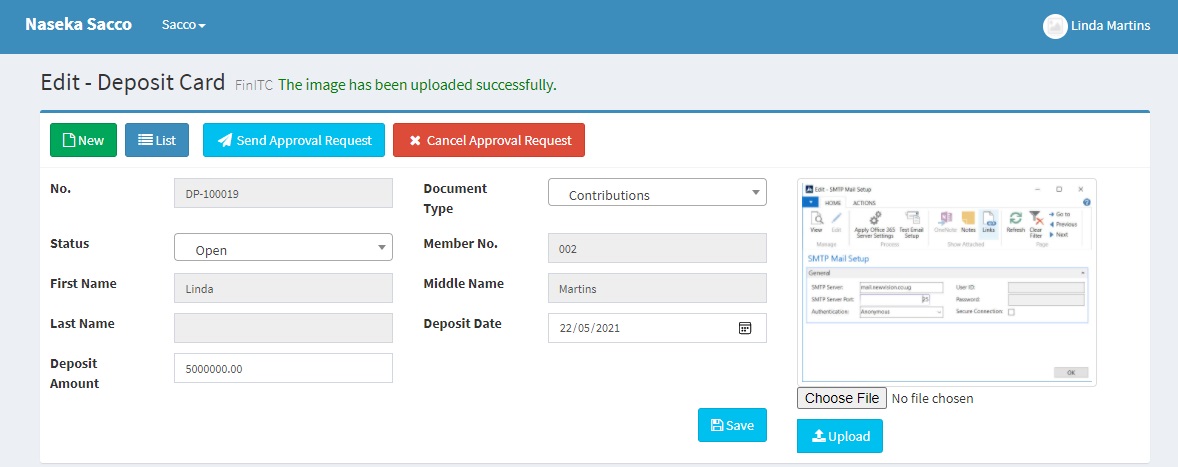
7.8. Send Deposit for Approval
In order to send the contribution/deposit for approval, edit the Deposit by click the pencil/edit action and attach a deposit slip or screenshot if it is an online payment. Click Send Approval Request. The Approval process is the same as that already discussed in 7.5. Approve Requests.
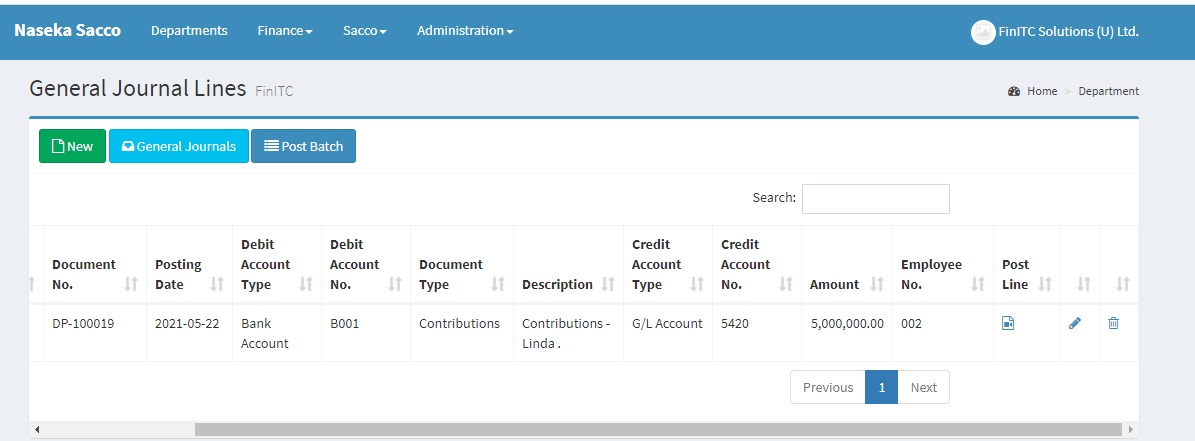
7.9. Review Contributions Journal Lines
When the contribution/Deposit is approved by the Sacco Accountant, the system automatically generates General Journal Lines in the Contribution batch. These journal lines can be accessed by Clicking Finance > General Ledger > General Journals. The Edit Journal column will show the number of entries created. Click on that number to open the journal. The system debits the Bank Account (Asset) and credits the Member Contributions Account (Income). It also attaches the Member No. as shown in the figure below. Posting the entry to have the balance reflect on the member statement. Refer to section 5.3. Post General Journal Line.
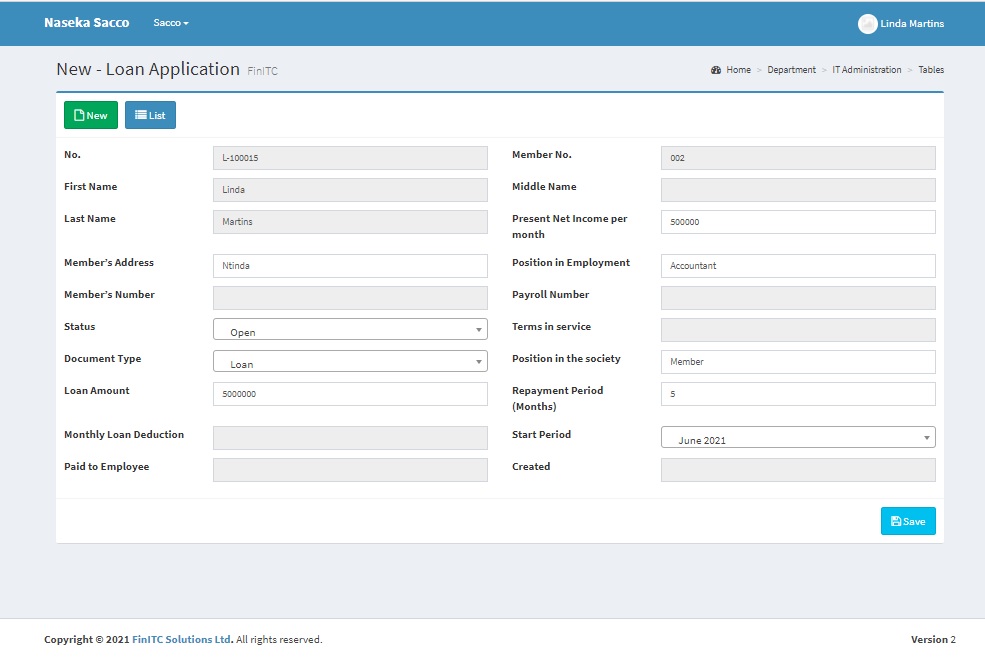
7.10. Loan Requisitions
Sacco Members can request for loans by using the loan application module. A loan can be created by clicking Sacco > Sacco Details > Loan Application. Click New to create a new loan. Enter the relevant fields as shown in the figure below and finally click Save
7.11. Loan Purpose & Guarantors
After creating the new loan, click the Edit icon (Pencil) to add the purpose of the loan and Loan Guarantors. Adding Guarantors will send e-mail notification and approval request entries to the specific guarantors
Sacco Investments
Saccos transform member savings to investments. The FinITC Sacco Management Systeme ships with an investment module that allows sacco accountants to invest in Fixed Deposits, Treasury Bills and Treasury Bonds.
FAQs
Explore a list of frequently asked questions (FAQs) and answers in relation to the FinITC Sacco Management System.